September 27, 2011

Apple Cake

It's finally starting to happen; the weather here in The South is turning a bit cooler (low 80s and upper 70s), the fall rains have begun and this weekend it might actually get into the upper 40s at night.  Fall is finally on its way!

This change of season inevitably gets me baking.  The cooler weather simply begs for something yummy and warm to come out of the oven.  After spending some time outside in the fall air--enjoying football, raking leaves, taking a leisurely evening stroll--there is nothing quite like stepping into my house and being welcomed by the aroma of something delicious baking in the oven.  Suddenly, my haven't-mopped-in-a-week kitchen becomes a Norman Rockwell painting and all feels right in the world.

Yesterday, after a day full of grey skies and impending thunderstorms, my need to bake for fall was fully satisfied with Apple Cake.  The light, cinnamon/nutmeg/apple cake, topped with the warm, rich, butter & vanilla sauce is perfect for jump starting the fall baking season. 

Thanks go to my sister, Aerwyn, for sharing this cake with me several times during the falls and winters of my college years.

Apple Cake (Source: Aerwyn Whitlock)

2 cups sugar
1/2 cup shortening
2 eggs
6 medium apples--peeled and finely chopped
2 cups flour
2 teaspoons baking soda
2 teaspoons cinnamon
3/4-1 teaspoon nutmeg
1 teaspoon salt
1 cup chopped pecans (or walnuts)

Vanilla Sauce

1 1/2 cups butter
3 cups sugar
1 1/2 cups evaporated milk
1 1/2 teaspoons vanilla
1-1 1/4 teaspoons nutmeg

1.  Preheat oven to 350 degrees.  Generously grease and flour a bundt pan.  (A 9x13 would work too, but the bundt pan makes it look prettier.)

2.  In a large bowl or stand mixer, combine sugar, shortening, and eggs.  Mix well.  Add apples, stir until combined.

3. In a separate bowl, combine flour, baking soda, cinnamon, nutmeg, and salt.

4. Add flour mixture to apples, mix until just combined.  Gently stir in nuts.

5.  Pour batter evenly into bundt pan.  Bake for 45-50 minutes.

6. To make the Vanilla Sauce, combine butter, sugar, and evaporated milk in a medium saucepan.  Cook over low heat for 10-15 minutes.  Do NOT boil.

7. Remove from heat; add vanilla and nutmeg, stir well.  While still hot, serve generously over Apple Cake slices.

September 23, 2011

Chocolate Peanut Butter Cookies

My daughter, who is the official cookie baker in our house, recently tried these yummy cookies from King Arthur Flour. They are tasty, rich, and sturdy- perfect for packing in a lunchbox. They are a dense, but soft cookie and would also be great with a tall glass of cold milk.

P.S. Go check out the King Arthur Flour website, it is chock full of great recipes and great baking items! Here is the link to the original recipe:http://www.kingarthurflour.com/recipes/chocolate-peanut-butter-cookies-recipe


Chocolate Peanut Butter Cookies adapted from King Arthur Flour

Ingredients:

1 1/2 cups flour (You may want to weigh your flour- you don't want any extra- these cookies are already dense)
1/2 cup cocoa
1/2 teaspoon baking soda
1/4 teaspoon salt
1/2 cup granulated sugar
1/2 cup brown sugar
1/2 cup (8 tablespoons) unsalted butter, softened
1/4 cup smooth peanut butter
1 teaspoon vanilla extract
1 large egg
2 tablespoons water
1 1/2 cups mini peanut butter cups or peanut butter chips (we used chips)
Note: I was just thinking- you could use a mix of chocolate and peanut butter chips to achieve more of the peanut butter cup taste...

Directions:


1) Preheat the oven to 375°F. Lightly grease two baking sheets, line with parchment paper or use Silpat silicone baking liners.
2) Mix together the flour, cocoa, baking soda, and salt in a medium-sized bowl.
3) In another bowl, beat together the sugars, butter, and peanut butter until light and fluffy.
4) Beat in the vanilla, egg, and water, then stir in the dry ingredients, blending well.
5) Stir in the mini peanut butter cups or peanut butter chips.
6) Scoop rounded tablespoonfuls of dough onto the prepared baking sheets. Flatten each cookie with your hand or the bottom of a glass to about 1/2" thick. - Make sure you press them down; they do not spread.
7) Bake the cookies for 7 to 9 minutes, or until they're set and you can smell chocolate. Be careful not to overbake. Remove them from the oven, and cool on a rack. 


September 21, 2011

Creamy Chicken Alfredo

It's been raining and cloudy here in The South for the last week or so and even though the temps are still in the 80s and the humidity is as thick as ever, if I stay inside and just look out the window, I can almost convince myself that Fall has arrived.  The weatherman says that maybe next week we'll get some cooler, fall-like temperatures;  we'll see if he's right.

For now though, just the idea that Fall is on its way with football games, Halloween, and the changing leaves...my brain automatically switches over from summer-food to comfort food, no matter what the weather is like outside.

I made this Creamy Chicken Alfredo the other night--after a long day of grey skies and stormy weather...and it definitely settled itself into the yummy-fall-day-comfort-food category.  I'm ashamed to admit that I'd never made homemade Alfredo-sauce before...for some reason the possibility of it separating and having a grainy texture had always been intimidating to me.  But this recipe was super quick----I had it on the table in about 35 minutes--and it tasted great with no separating.  Not bad for a new recipe.  I doubled the Alfredo sauce and put the extra sauce over noodles and served with steamed broccoli.

T-Man's Review: Can we have this again tomorrow?


Creamy Chicken Alfredo (adapted from Easy to Bake, Easy to Make)

1/4 cup all-purpose flour
6 boneless, skinless chicken-breast halves (about 4 ounces each) (next time I'll pound these flat a little too so they cook more evenly)
1/2 teaspoon salt
2 Tablespoons plus 1 teaspoon olive oil, divided (or use butter for a richer flavor)
3 cloves garlic, minced
1 Tablespoon minced onion
1 1/2 cups whipping cream
1/3 cup grated Parmesan cheese (I used fresh shredded Parmesan because that's what I had)
1/2 teaspoon coarsely ground black pepper
1 Tablespoon coarsely chopped fresh parsley

1. Preheat oven to 375 degrees.  Place flour in a shallow dish or pie plate.  Sprinkle chicken with salt; dredge chicken in flour until coated.  Heat 2 Tablespoons olive oil (or butter) in large skillet over medium-high heat until hot.  Add chicken; cook, turning once, until golden, 2-4 minutes per side.  Remove chicken from skillet; place in a 9x13-inch baking dish.

2. Heat remaining olive oil (or butter) in same skillet over medium heat until hot.  Add garlic and onion; cook until garlic is fragrant and onion is tender, 1-2 minutes.  Increase heat to medium-high; add whipping cream, Parmesan and pepper.  Cook until sauce is bubbly and slightly thickened, 2-3 minutes.  Spoon sauce over chicken in dish.

3. Bake chicken until an instant-read thermometer inserted in center of chicken registers 180 degrees, 8-12 minutes.  Sprinkle with parsley.

September 4, 2011

Lime Coconut Rolls

I know I have posted three days in a row now, but the weather turned cool today and I felt like baking. I guess it wasn't quite cool enough, because I made up these lime coconut rolls instead of making the traditional cinnamon ones. They turned out mouthwatering-  tangy lime and sweet coconut in a soft lime-scented dough. Just right for the first touch of fall at the end of summer.
Notes: I like lime, if you want to accentuate the coconut, use less lime juice in the frosting and filling. You could also add coconut extract to the icing or filling to up the ante on the coconut. If you don't like the feel of coconut, but love the flavor, use only the cream of coconut and reduce the amount of lime juice in the filling. In the future I may try using coconut milk in place of regular milk in the dough.~W

Lime Coconut Rolls(dough adapted from McCall's Cinnamon Twist Bread)

Ingredients for the dough:
1 c. milk
1/4 c. shortening
1/2 c. sugar
2 tsp. salt
2 pkgs. active dry yeast (2 TBS instant yeast)
1/2 c. warm water
6 cups sifted flour
2 eggs, slightly beaten
2 tsp. lime zest

For the filling:
3 TBS lime juice
3/4 c. cream of coconut
1 1/2 cups sweetened, flaked coconut

For the icing:
1 c. powdered sugar
1/2 -1 tsp lime juice
1/2 c. cream of coconut
1 -1 1/2 tsp. milk

Directions:
1. Scald milk; stir in shortening, 1/2 c. sugar and salt. Cool to lukewarm.
2. Sprinkle yeast on warm water in large bowl: stir to dissolve. Stir in 3 c. flour, eggs and milk mixture. Beat with electric mixer 2 minutes at medium speed, scraping bowl occasionally. Or beat by hand until batter sheets off spoon. Mix in lime zest. Mix in enough remaining flour with hands, a little at a time, to make a soft dough that leaves the sides of the bowl.
3. Turn out onto lightly floured board: knead until smooth, about 19 minutes.
Bread Machine Method: Put all ingredients into pan of bread machine. Use dough setting to mix and knead bread. Add lime zest with other ingredients or during second kneading. Continue with step 4. 
4. Place in lightly greased bowl: turn dough over to grease top. Cover and let rise in a warm place until doubled, about 1 1/2 hours.
5. Gently deflate dough with hands. Cover and let rise again until almost doubled, about 30 minutes. Turn out onto lightly greased board or Rollpat.  Let rest 10 minutes.
6. While dough is resting, mix together lime juice and cream of coconut for the filling.
7. Roll dough out into a 26" X 14 " rectangle. Spread with lime juice and cream of coconut filling. Sprinkle flaked coconut over the filling.
8. Roll the dough up from the long sides, like a jelly-roll. Cut into 24 slices (about 1 inch each). Place in greased pan. (Will fill (2) 9X13 pans). Cover and let rise until doubled 45-60 minutes.
9. Bake in a 350° oven for 18- 20 minutes or until tops are golden brown. If using glass or dark pans, watch carefully, so as not to burn the bottom of rolls.
10. Remove from oven and let cool slightly.
11. While rolls are cooling, mix together icing ingredients. Mix until smooth. Use enough milk to make a thick drizzle. Drizzle and spread icing on warm rolls.
12. Serve warm or at room temperature. Cover leftover rolls tightly.

Whitney's Garden Salsa


We came up with this recipe for salsa after we started gardening a few years ago. We bring it out in the bleak winter months and eat it right out of the jar with chips. 

Whitney's Garden Salsa

Ingredients:
14 cups peeled, chopped tomatoes
5 medium onions, coarsely chopped (about 2 1/2 cups)
2 green bell peppers, chopped
8 jalapeno peppers seeded and chopped (wear gloves while seeding and chopping)
8 cloves garlic finely chopped
2  5.5 oz. cans tomato paste
1/2 cup white vinegar
1 bunch cilantro, chopped
1 tsp. ground cumin
4 TBS. salt (use less, if desired)
1 large lime, juiced

Directions:
Boil all ingredients together in a large stockpot for about 30 minutes to thicken.
Put in hot jars. Seal. Water bath for 20-25 minutes. Makes 10-12 pints.

September 3, 2011

Summer Salad

This is a more- or- less recipe. Add more or less of whatever suits you. I like lots of mango, cilantro and lime and less black beans.

Summer Salad
Ingredients:
2 mangoes, peeled and diced
1 14.5 oz can black beans, rinsed and drained
4 ears corn, boiled and kernels cut off cob (or use high quality frozen, thawed and drained)
2 cups cut strawberries (quarters or eighths)
2 medium avocados, peeled and diced
1/2 bunch cilantro, washed, stems removed and chopped
1 lime

Directions: 
Combine mango dices, black beans, corn kernels, strawberries, avocado dices and cilantro in a large bowl. Cut lime in half and squeeze juice over the salad. Gently toss to coat. Cover and refrigerate 1-2 hours before serving.

August 24, 2011

Kielbasa with Onions and Apples

After a splurge buy on polish sausage, I had to come up with some way to use it. I found this recipe and was happily surprised. It will be a permanent addition to my fall and winter meal repertoire. We served it with mashed potatoes, but I think diced potatoes, rice, or egg noodles would go as well, or better, with this rich, spicy- sweet dish.


Kielbasa with Onions and Apples adapted from Gourmet Dec.2006

Ingredients:
2 -2.5 pounds smoked kielbasa (preferably beef and pork), cut crosswise into rounds
2 tablespoons olive oil
3 large onions, chopped (6 cups)
1 teaspoon black pepper
1/2 stick (1/4 cup) unsalted butter
3 large Granny Smith apples
1 3/4 cups reduced-sodium chicken broth (14 fluid ounces)


Directions:

Heat 1 tablespoon oil in a 12-inch heavy skillet over moderate heat until hot but not smoking, then brown half of sausage, turning occasionally, until golden, about 4 minutes. Transfer to a bowl and cover to keep warm. Pour off fat from skillet and wipe skillet clean. Add remaining tablespoon oil to skillet and brown remaining sausage in same manner, transferring to bowl as cooked.
Wipe skillet clean again, then cook onions with salt and pepper in butter over moderate heat, stirring occasionally, until golden brown, 15 to 20 minutes. Meanwhile, peel, core, and dice apple. Stir apple and broth into onion mixture and simmer briskly, uncovered, stirring occasionally, until apple is tender, 6 to 7 minutes. Add sausage and simmer, stirring, until heated through, about 1 minute.


August 20, 2011

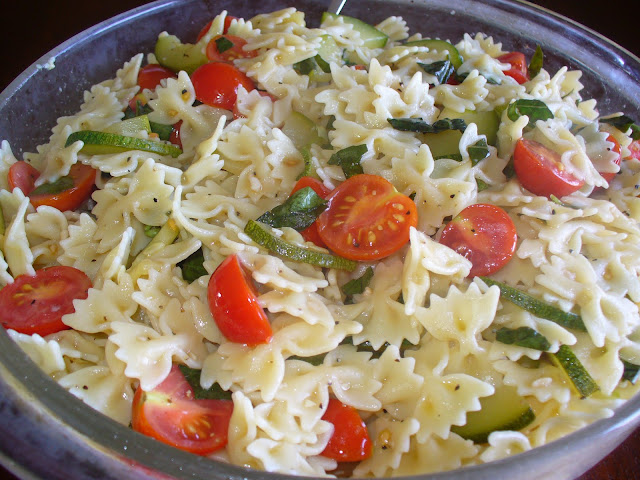
Marinated Zucchini with Bow Ties

This dish showcases the glorious tastes of summer vegetables. You could add diced cooked or grilled chicken or even some pepperoni to make it an entree. I think some cheese (parmesan, pecorino-romano) would be good in this salad as well.  My friend, Garnet, brought this to a barbecue; I thought it was delicious and got her recipe. Enjoy!


Marinated Zucchini with Bow Ties

Ingredients:
2 Tbs. olive oil
2-3 cloves minced garlic
1 medium sized zucchini, sliced into bite size pieces
1 1/4 tsp salt
3/4 lbs cherry tomatoes halved
1/2 cup fresh chopped basil (more or less to taste)
3 Tbs. wine vinegar
3/4 tsp. ground black pepper
1/2 box bow tie pasta (I like the mini ones. But big ones work too.)
1/4 cup olive oil

Directions:
Heat 2 Tbs. olive oil in frying pan. Add garlic, 1/4 tsp salt and zucchini. Toss to coat, then cook until tender, about 5 minutes. Transfer zucchini into large stainless steel or glass bowl and stir in tomatoes, basil, vinegar, remaining salt, and pepper. Cook pasta as directed. Drain and toss in with marinated zucchini and 1/4 cup olive oil.

August 13, 2011

Jake's Barbecue Ribs

Our neighbor, Jake, has taken over the cooking at his house. His kids aren't necessarily too adventurous in the eating arena, so Mr. D and I get to be the "taste testers"- a job we thoroughly enjoy. Jake brought us a sample of these ribs and we thought they were so good- we made them two weeks in a row. Make sure to leave enough time for the rub to flavor the meat, we leave it on overnight.

Jake's Barbecue Ribs

BBQ Ribs
2 racks baby back ribs
3 cups BBQ sauce (recipe that follows or use your own favorite)
1 cup rib rub (recipe follows)

Directions:
1. Remove silver skin from the back of the ribs. Liberally apply rib rub to the ribs 8-24 hours before cooking. Wrap in plastic wrap, place on a baking sheet or pan and place in refrigerator.

2. When ready to cook, preheat oven to 350°. Coat ribs with a layer of BBQ sauce and place in a shallow baking dish, meat side down. (I use my half sheet cookie pan, with sides). Cook for 1 hour, 45 minutes.

3. Transfer ribs to preheated grill over medium heat. Baste with sauce, turning regularly and basting each turn. Grill about 10-15 minutes until sauce is thickened and rib meat is tender.

Rib Rub: 
1/2 cup brown sugar
1/4 cup paprika
1 TBS black pepper
1 TBS salt
1 TBS chili powder
1 TBS garlic powder
1 TBS onion powder
1 tsp. cayenne pepper (can adjust to taste)

Directions:
Combine all ingredients together in small bowl, mix well. Transfer to airtight container or use immediately.

BBQ Sauce
2 cups ketchup
1 cup water
1/2 cup apple cider vinegar
5 TBS brown sugar
5 TBS sugar (or use all brown)
1/2 TBS black pepper
1/2 TBS onion powder
1/2 TBS ground mustard
1/2 TBS garlic powder
1 TBS lemon juice
1 TBS Worcestershire sauce
1/2 TBS liquid smoke

Directions:
In a medium saucepan, combine all ingredients. Bring mixture to a boil, reduce heat to a simmer. Cook, uncovered, stirring frequently for 1 hour 15 minutes.


August 7, 2011

Strawberry Cheesecake Cupcakes

Dr. C told me that for his birthday he wanted to keep it simple.  I still wanted "simple" to be "special" so when I saw these cupcakes on Joylicious and The Girl Who Ate Everything, we had to try them out.

I've modifided the recipe a bit, simply because it made too much crust and too much frosting.  Other than that, this was pretty tastey!

Strawberry Cheesecake Cupcakes

Graham Cracker Crust:
1 sleeve of graham cracker crumbs (about 9 whole crackers)
4 Tablespoons butter, room temperature
1 Tablespoon of sugar


Cupcakes:
1 1/2 cup all purpose flour
1 teaspoon baking powder
1/2 teaspoon salt
12 Tablespoons unsalted butter, room temperature
1 cup + 2 Tablespoons sugar
1 teaspoon vanilla extract
1/2 cup sour cream
4 large egg whites
2 cups fresh strawberries, hulled and coarsely chopped (and more for garnish)

Preheat oven to 350 degrees and line 16-18 muffin tins with cupcake liners.  Mix graham cracker crumbs with butter and sugar using a food processor.  Sprinkle about 1 tablespoon of the crushed graham cracker into the bottom of each prepared muffin tin.  Press down using fingers and bake for 3-5 minutes or until slightly browned.  Remove immediately from oven and set aside to cool.

In a medium bowl beat the egg whites until stiff, glossy peaks appear, about 3-4 minutes, be careful not to overbeat. Set aside.

In a small bowl, mix together the flour, baking powder and salt. Set aside.


Cream Cheese Frosting

1 (8 ounce) packets of cream cheese

In a large bowl, cream together butter and sugar until light and fluffy.  Then add the vanilla and beat on a low-speed. Next, add half the flour mixture until incorporated.  Then mix in the sour cream. Add remaining flour and mix until just blended.

Gently fold 1/3 of the egg into the batter until combined, do not over mix the egg whites or the cake will fall flat. Add remaining egg and fold in the chopped strawberries.
Fill each muffin tin about 3/4 of the way and bake for about 20 minutes depending on your oven. You can test to see if they are done by sticking a toothpick through the center, if it comes out clean, they are done.

1 sticks of unsalted butter (8 Tablespoons)
1 3/4 cups + 2 Tablespoons powdered sugar, sifted
1/2 tsp vanilla extract


In a large mixing bowl, beat the cream cheese, butter and vanilla together until smooth.
Add the sugar slowly in small batches, beating on low speed until incorporated.
Once all sugar has been added, increase the speed to high and mix until light and fluffy. Refrigerate for 1 hour.  When ready to serve, spread icing on cupcakes or use a pastry bag with a star tip. Garnish with freshly cut strawberries and graham cracker crumbs and refrigerate until ready to serve. 

July 1, 2011

Heath Bar Cheesecake

It must be time for Junior's Cheesecake! Our mom made this over-the-top cheesecake for our brother's birthday, it looked so delicious I asked her if I could guest post it here. Thanks Mom!

Junior's Heath Bar Cheesecake
from Junior's Cheesecake cookbook pages 121 and 122
I've added my own thoughts and changes in red.

For the crust:
1 recipe 9 inch Dark Chocolate Sponge cake crust (I used theirs but I'm sure you can use your own favorite)
Three 1.4 ounce Heath brand milk chocolate English toffee candy bars (I bought the snack size Heath bars for all of this. They were cheaper per ounce than the large bars. I don't think the extra chocolate hurt anything. I used about 4 ounces worth for the crust.

For the cheesecake:
One 8 ounce Hershey's milk-chocolate bar (I used a different brand)
Four 8 ounce packages cream cheese (use only full fat) at room temperature
1 2/3 cups of sugar (this is divided...use 1/3 at one time and 1 1/3 a little later I think slowly adding in the sugar would have been an option)
1/3 cup of cornstarch
1 Tablespoon pure vanilla extract
2 extra large eggs
1/4 cup heavy cream
For the topping:
Five 1.4 ounce Heath bars (for this I used about 7 ounces of the small bars)
Whipped Chocolate ganache rosettes (optional)

Makes one 9-inch Cheesecake About 2 1/2 inches high


1) Preheat the oven to 350 degrees F. Generously butter the bottom and sides of a 9-inch springform pan. wrap the outside with aluminum foil, covering the bottom and extending all the way up the sides. Make and bake the crust and leave it in the pan. Keep the oven on. while the crust cools, chop 3 Heath bars with a chef's knife into small chunks and sprinkle over cooled crust.

2) Melt the Hershey's bar and set aside to cool. Put one package of the cream cheese, 1/3 cup of the sugar, and the cornstarch in a large bowl. Beat with an electric mixer on low until creamy, about 3 minutes, scraping down the bowl several times. Blend in the remaining  cream cheese, one package at a time, scraping down the bowl after each one. Increase the  mixer speed to medium and beat in the remaining 1 1/3 cups of sugar, then the vanilla. Blend in the eggs, one at a time, beating well after each one. Blend in the melted chocolate, then the cream, beating until completely blended. Don't over mix!This made me laugh-beat the thing, blend it, but don't over mix it! Gently spoon the batter on top of the crust.

3) Place the cake in a large shallow pan containing hot water that comes about 1 inch up the sides of the springform. Bake until the edges look baked and the top of the cake appears set, about 1 1/2 hours. Remove the cake from the water bath, transfer to a wire rack, and let cool for 2 hours (just walk away-don't move it). Leave the cake in the pan, cover loosely with plastic wrap, and refrigerate until completely cold, preferably overnight or at least 4 hours. Transfer to the freezer for 1 hour.
4)While the cake is in the freezer, cut 1 Heath bar into 2 equal pieces and reserve one for the center decoration. Chop the remaining 4 1/2 bars for the topping with a chef's knife into small chunks. If you want to decorate with the whipped cream rosettes. make the ganache and refrigerate for at least one hour.

5) To decorate, release and remove the sides of the springform, leaving the cake on the bottom of the pan. Place on a serving plate. Pipe shells or fleur-di-lis of ganaches around the bottom edge and top rim of the cake, if you wish. I didn't wish-so I poured the ganache over the top of the cake, starting near the edges to get the look I wanted. I then poured caramel sauce over the ganache-which was a complete waste. Maybe melted caramels would have had enough flavor to stand up to the ganache but the sauce did not. Sprinkle the candy chunks on top of the cake, covering it almost completely. Decorate the center with the reserved half of the Heath bar. This is probably a great idea if you need to advertise what type of candy bar is being used but seemed certain to cause contention when the cake was cut in my opinion (as in "I get that piece") so I didn't do it. :)
Refrigerate until ready to serve. Slice with a sharp straight edge knife, not a serrated one. Cover any leftover cake and refrigerate or freeze up to one month.

June 28, 2011

Strawberry Swirl Cheesecake

On Father's Day, Dr. C wanted to "keep it simple" and just grill some homemade burgers, make some fries in the big fryer, have some grilled mushrooms, and a cheesecake for dessert.
Our Father's Day Burger and Fries

I'm not sure if "simple" was the right word for it all, but it sure was tasty!

We tried a new recipe for the cheesecake from Junior's Cheesecake Cookbook.  It was fabulous, but a bit time consuming.  Let's just say it's a bad idea to start making this cheesecake at 10:30PM the night before Father's Day when you have to get up at 6AM for early morning church meetings. 

Despite the lack of sleep, it was definitely worth the effort.

Strawberry Swirl Cheesecake
from Junior's Cheesecake Cookbook by Alan Rosen and Beth Allen

Makes One 9-inch Cheesecake, about 2 1/2 inches high

For the Sponge Cake Crust:
1/3 cup sifted cake flour
3/4 teaspoon baking powder
pinch of salt
2 extra-large eggs, separated
1/3 cup sugar
1 teaspoon pure vanilla extract
2 drops pure lemon extract
2 Tablespoons unsalted butter, melted
1/4 teaspoon cream of tartar

For the Cheesecake:
10oz. (about 1 cup) dry-pack frozen whole strawberries (unsweetened, not in syrup), thawed & drained well
5 Tablespoons cornstarch
Three 8oz. packages cream cheese (use only full fat) at room temperature
1 1/3 cups sugar
1 Tablespoon pure vanilla extract
2 extra-large eggs
2/3 cup heavy or whipping cream, plus 1 Tablespoon for brushing
1 quart large ripe fresh strawberries

Directions:
1. Preheat oven to 350 degrees and generously butter the bottom and sides of a 9-inch springform pan.  Wrap the outside with aluminum foil, covering the bottom and extending all the way up the sides.

2. In a small bowl, sift the flour, baking powder, and salt together.

3. Beat the egg yolks in a large bowl with an electric mixer on high for 3 minutes.  With the mixer running, slowly add 2 Tablespoons of the sugar and beat until thick light yellow ribbons form, about 5 minutes more.  Beat in the extracts.

4. Sift the flour mixture over the batter and stir it in by hand, just until no more white flecks appear.  Now, blend in the melted butter.

5. For this step, make sure your mixing bowl and beaters are very clean--if even a little fat is left, this can cause the egg whites not to whip.   Now, Put the egg whites and cream of tartar into the bowl and beat with the mixer on high until frothy.  Gradually add the remaining sugar and continue beating until stiff peaks form (the whites will stand up and look glossy, not dry).  Fold about one-third of the whites into the batter, then the remaining whites.  Don't worry if you still see a few white specks, as they'll disappear during baking.

6. Gently spread out the batter over the bottom of the pan, and bake just until set and golden (NOT wet or sticky), about 10 minutes.  Touch the cake gently in the center.  If it springs back, it's done.  Watch carefully and don't let the top brown.  Leave the crust in the pan and place on a wire rack to cool.  Leave the oven on while you prepare the batter.

7. Pulse the thawed strawberries in your food processor or blender until smooth (you need 3/4 cup of strawberry puree).  Stir in 1 Tablespoon of the cornstarch and set aside.  It will thicken slightly as it stands.

8. Put one package of cream cheese, 1/3 cup of the sugar, and the remaining 4 Tablespoons of cornstarch in a large bowl.  Beat with an electric mixer on low until creamy, about 3 minutes, scraping the bowls down several times.  Blend in the remaining cream cheese, one package at a time, scraping down the bowl after each one.  In crease the mixer speed to medium and beat in the remaining 1 cup sugar, then the vanilla.  Blend in the eggs, one at a time, beating well after adding each one.  Beat in 2/3 cup of the cream just until completely blended.  Be careful not to over mix!  Gently spoon the batter on top of the crust.

9. Using a teaspoon, drop the strawberry puree in small spoonfuls on top of the batter, pushing it down slightly as you go.  Using a thin, pointed knife, cut through the batter a few times in a figure-8 design, just until red swirls appear. (Don't mix in the puree completely or the whole cake will turn pink and you'll lose the swirls.)

10. Place the cake in a large shallow pan containing hot water that comes about 1 inch up the sides of the springform.  Bake until the edges are light golden brown and the top is slightly golden tan with strawberry swirls, about 1 1/4 hours.  Remove the cheesecake from the water bath, transfer to a wire rack, and let cool for 2 hours (just walk away--don't move it).  Leave the cake in the pan, cover loosely, and refrigerate until completely cold, at least 4 hours.

11.  Wash and hull fresh strawberries and slice them 1/4 inch thick from top to tip, reserving the biggest, prettiest berry for the center.

12. To serve, release and remove the sides of the springform, leaving the cake on the bottom of the pan.  Brush the top outer rim of the cake with the remaining 1 Tablespoon cream (this help the berries stay in place).  Arrange the sliced berries in a ring on top, with tips pointing outward, angling and overlapping the berries as you go.  Enjoy!


This is what Miss B looks like when you tell her that one piece of cheesecake is all she gets!

June 5, 2011

Lemon Coconut Cheesecake

At our house, we have a tradition of letting the birthday girl or boy choose their favorite dinner and birthday cake. This is the cake my daughter wanted this year. She knows how to choose them-  It is rich, creamy, and decadent. I love the flavors and even though it is rich, it is not heavy. Plan some time for this one, it's pretty labor intensive- it took Mr. D and I all day to make one cake, but it is well worth the effort. Happy Birthday Princess!


Lemon Coconut Cheesecake from Junior's Cheesecake Cookbook by Alan Rosen and Beth Allen


For the Cheesecake layer:
3 8oz. packages full-fat cream cheese, room temperature
1 1/3 cups sugar
3 TBS cornstarch
1 TBS pure vanilla extract
2 extra-large eggs
2/3 cup heavy or whipping cream

For the Sponge Cake layer:
1/2 cup sifted cake flour
1 tsp baking powder
1/4 tsp salt
4 extra-large eggs, separated
1/2 cup sugar
1 tsp pure vanilla extract
1/2 tsp pure lemon extract
3 TBS unsalted butter, melted
1/4 tsp cream of tartar

For the Lemon Custard:
3 extra-large egg yolks
1 1/4 cups sugar
1/3 cup cornstarch
1/4 tsp salt
1 cup cold water
1 tsp grated lemon rind
1/4 cup strained fresh lemon juice
2 TBS unsalted butter
1 tsp pure vanilla extract
1/2 tsp pure lemon extract
1 to 2 drops yellow food coloring (optional)

For the Whipped Cream Frosting and Decorating:
1 TBS unflavored, granulated gelatin
3 TBS cold water
1 quart heavy or whipping cream
1/3 cup sugar
1 TBS pure vanilla extract
4 cups angel-flake coconut (about 11 oz.)

1.Early in the day, preheat the oven to 350°F and generously butter the bottom and sides of one 9-inch spring form pan and one 9-inch round layer cake pan. Wrap the outside of the spring form pan with aluminum foil, covering the bottom and extending all the way up the sides. Very important: Line the bottom of the cake pan with parchment or waxed paper (don't let the paper come up the sides).

2. Put one package of the cream cheese, 1/3 cup of the sugar, and the cornstarch in a large bowl and beat with an electric mixer on low until creamy, about 3 minutes, scraping down the bowl a couple of times. Blend in the remaining cream cheese, one package at a time, scraping down the bowl after each. Increase the mixer speed to medium and beat in the remaining 1 cup sugar, then the vanilla. Blend in the eggs, one at a time, beating well after adding each. Beat in the cream just until it's completely blended. Be careful not to overmix!

3. Gently spoon the batter into the foil- wrapped spring form pan and place it in a large shallow pan containing hot water that comes about 1 inch up the sides of the spring form. Bake the cake at 350°F until the edges are light golden brown and the top is slightly golden tan, about 1 1/4 hours. Remove the cake from the water bath, transfer to a wire rack, and cool in the pan for 2 hours, cover with plastic wrap, and refrigerate (while still in the pan) until it's completely cold, about 4 hours. Place in the freezer overnight and/or until ready to assemble the cake.

4. Meanwhile, prepare the sponge cake layer. Check that the oven is preheated to 350°F and that the water bath has been removed. In a small bowl, sift the flour, baking powder, and salt together. Beat the egg yolks in a large bowl with an electric mixer on high for 3 minutes. While the mixer is still running, slowly add 1/4 cup of the sugar and beat until thick, light yellow ribbons form in the bowl, about 5 minutes more. Beat in the extracts.  Sift the flour mixture over the batter and stir it in by hand, just until no white flecks are visible. Blend in the melted butter. Put the egg whites and cream of tartar in a clean medium-size bowl and beat with clean, dry beaters on high, until frothy. Gradually add the remaining 1/4 cup sugar and beat until stiff peaks form (the whites will stand up and look glossy, not dry). Fold about one-third of the whites into the batter, then the remaining whites. Don't worry if you still see a few white specks- they'll disappear  during baking. Gently spread out the batter over the bottom of the single cake pan and bake until golden (not wet and sticky) and the center springs back when lightly touched, about 15 minutes. Let the cake cool on a wire rack in the pan for 15 minutes, then turn out onto the rack and peel off the paper liner. Let the cake cool completely, about 2 hours, then cover with plastic wrap and refrigerate until ready to assemble.

5. When ready to assemble the layers, remove the frozen cheesecake from the freezer and let stand at room temperature while you make the frosting. Place the gelatin in a heatproof measuring cup, stir in the cold water, and let stand until it sells and thickens. Cook in the microwave on high for about 30 seconds or over a pan of simmering water for about 1 minute, until clear and completely melted. In a  medium-sized bowl with clean, dry beaters, whip the cream with the mixer on high until it thickens and soft peaks just begin to form. With the mixer still running, add the sugar and beat just until the the cream stand up in peaks (don't overmix or the cream will curdle). Beat in the vanilla. Add the melted gelatin all at once and beat until thoroughly incorporated. Refrigerate the cream in two bowls: 2 cups in a small bowl for piping decorations on the top of the cake and the remainder in a second larger bowl for frosting the cake.

6. Remove the lemon custard from the refrigerator, transfer 2 tablespoons to a small bowl, and return this to the refrigerator (to use later to decorate the center of the cake). Place the sponge cake, top side down, on a cake plate. Spread with a thin layer of whipped cream from the large bowl, sprinkle with about 2/3 cup of the coconut, and gently spread with half of the lemon custard. Release and remove the ring of the spring form, then remove the frozen cheesecake from the bottom of the pan. Place top side down on the custard. Top the cheesecake with some more whipped cream, sprinkle with about 2/3 cup coconut, and spread with the remaining custard in the large bowl.

7. To decorate, frost the top and sides of the cake with the remaining whipped cream in the large bowl. Using your fingers, gently pat coconut on the side of the cake and sprinkle the rest on the top. Fit a pastry bag with a medium closed-star tip or medium open-star tip and fill with the cream from the small bowl. Pipe shells or rosettes around the top edge of the cake and a circle of 7 cream rosettes  in the center. Fill the circle with the 2 tablespoons reserved lemon custard.

8. Refrigerate the cake for at least 2 hours to allow the cheesecake to thaw enough to slice easily. Use a sharp straight-edge knife (not serrated) to cut it. Cover any leftover cake with plastic wrap and refrigerate, or wrap and freeze for up to 1 month.

May 23, 2011

Grilled Portobello Mushrooms

I have been cooking lately; I've even been trying new recipes, but unfortunately most of them haven't turned out so great.  The worst of it was when we didn't have our Mother's Day dinner on Mother's Day...so we had it the next day and invited some friends (who also missed Mother's Day dinner) over to join us.  I had a couple of new recipes on the menu and they were barely edible not-so-hot.

Sorry friends, I'm really not a bad cook, I promise.

The saving grace of that night was that I had added one of my long-time favorite grilling recipes to the menu--Grilled portobello mushrooms. 

This picture is not fabulous, but these mushrooms are quite possibly the best

Thank you, yummy mushrooms, for leaving saving me some shred of cooking dignity when all the other recipes failed.


Grilled Portobello Mushrooms

1/2 cup finely chopped red bell pepper
1 clove garlic, minced
1/4 cup olive oil
1/4 teaspoon onion powder
1 teaspoon salt
1/2 teaspoon ground black pepper
4 portobello mushroom caps, washed and sliced

1. In a large bowl, mix the red bell pepper, garlic, oil, onion powder, salt, and ground black pepper. Add in mushrooms and toss until coated.
2. Cover grill grate with aluminum foil.  Lightly oil foil (or spray with cooking spray).
3. Place mushrooms on foil, close grill, and cook over medium heat for 15 to 20 minutes, stirring occasionaly.

Source: adapted from allrecipes.com.

April 9, 2011

Berry & Spice Syrup

At our house, when you ask Fearless the days of the week, he'll tell you: Monday, Tuesday, Wednesday, Thursday, Friday, Pancake Day, Sunday.

This Pancake Day, we were out of our usual maple syrup, so I made this sauce instead.  T-Man told me that from now on, we should skip the maple, and just make this stuff every week. 

I think he might be right.

This would taste great over french toast or maybe even angel food cake too.


Berry & Spice Sauce

1/2 cup sugar
1 Tablespoon cornstarch
1/2 teaspoon ground cinnamon
1/4 teaspoon ground nutmeg
1/2 cup water
2 cups fresh or frozen mixed berries (I used a frozen mixture of blueberries, raspberries, strawberries, and blackberries)

In a saucepan, combine sugar, cornstarch, cinnamon and nutmeg.  Gradually stir in water until smooth.  Bring to a boil; cook and stir for 1 minute or until thickened.  Stir in berries; return to a boil.  Reduce heat; cook and stir for 5 minutes.  Serve warm.

(Modified from allrecipes.com)

April 6, 2011

Apricot Glazed Pork Tenderloin

I found this recipe in my Very Virginia cookbook.  I was looking for something new, but simple enough that I wouldn't be spending the whole day Sunday figuring it out.  This recipe would have fit that description...except I didn't read the recipe instructions very well and you are supposed to let it marinate overnight. 

Oops. 

We barbequed chicken on Sunday instead, and enjoyed this pork tenderloin on Monday night after it had it's required marinating time.  It was well worth the wait--the kids all asked for 2nds and 3rds and Dr. C and I about had a brawl over the last piece.


Apricot Glazed Pork Tenderloin

1 1/2-2 pounds pork tenderloin
1/4 cup soy sauce
1/4 cup cider vinegar
2 Tablespoons dark brown sugar (I used light brown because that's what I had)
2 Tablespoons honey
2/3 cup apricot preserves
1 1/2 teaspoons Dijon mustard

Place tenderloin in a large shallow dish (or a gallon-sized ziploc bag).  In a small bowl, combine soy sauce, vinegar, brown sugar, and honey.  Pour mixture over tenderloin.  Cover and refrigerate overnight.

Preheat oven to 350 degrees.  Drain tenderloin, reserving marinade, and place in a large shallow baking pan.  Spoon 1/4 cup of the reserved marinade over tenderloin.  Bake 30-40 minutes, basting every 10 minutes with the remaining marinade.  Remove from oven and drain marinade.  In a small bowl, combine preserves and mustard.  Spoon over meat.  Bake 10 additional minutes or until a meat thermometer regiesters 160 degrees.  Cut into thin slices and serve with apricot mixture.

March 30, 2011

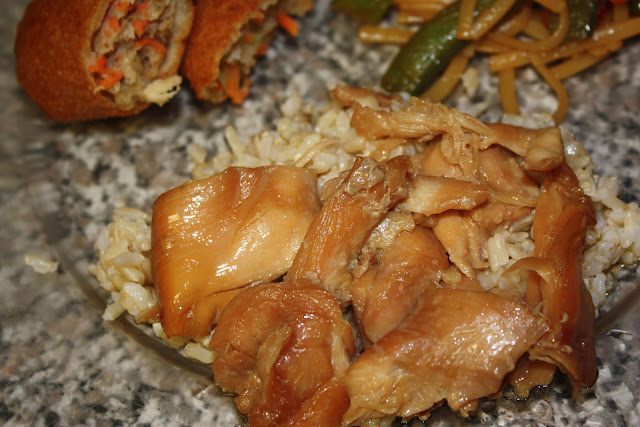
Asian Chicken

We've had a pretty hectic past few weeks.  Between a nasty little stomach bug and having oodles and oodles of leftovers from various church functions, I have hardly cooked anything.  So at this point we are all pretty sick of random-whatever-is-in-the-fridge-or-comes-from-a-box meals.

Unfortunately, life is still crazy, so tonight I wanted something simple, but satisfying.  This Asian Chicken definately hit the spot.  Since I didn't have much time, I served it with steam-in-the-bag brown rice, egg rolls, and stir-fry veggies.


Asian Chicken
2 pounds boneless, skinless chicken thigh tenders (DON'T use chicken breasts--it would be too dry)
1/2 cup soy sauce
1/3 cup packed brown sugar
2 Tbsp. sesame oil (I used peanut oil)
3 cloves garlic, minced

Place thighs into the bottom of a crockpot.  Lay as flat as possible.  Combine the rest of the ingredients in a samll bowl.  Pour over the chicken.  Cover and cook on low for three hours, stirring once.

(Source: 365 Days of Slow Cooking)

March 28, 2011

Grilled Peanut Butter Banana Split Sandwiches

My husband said to me tonight after making these: "This is one of the only desserts I know of that you laugh the whole time you are making them."
They are ooey-gooey- over the top- peanut butter- chocolate -banana splits on grilled Texas toast and dipped in whipped cream. Does it get any better or more fun than this?

Grilled Peanut Butter Banana Split Sandwiches (adapted from Cooking Light)

 For four sandwiches:

8 slices Texas Toast
3 TBS. butter, softened
4 TBS. creamy peanut butter
4 tsp. mini semisweet chocolate chips
4-6 strawberries thinly sliced
2 bananas, cut in half, and then cut lengthwise into strips (not circles)
4 TBS. pineapple jam or preserves (or pineapple ice cream topping works too)
Whipped Cream

1. Preheat a griddle or skillet over medium-high heat or about 350 degrees.

2. Spread one side of Texas toast with butter (~1/2 tsp.) Turn bread over and spread toast with 1 TBS. peanut butter, followed by 1 TBS. pineapple preserves. Sprinkle preserves with 1 tsp. mini chocolate chips. Top evenly with strawberry slices and then banana slices. Place second piece of Texas toast on top of the sandwich and spread with butter.

3. Cook the sandwich on the griddle or in the pan about 2 minutes on each side, or until lightly browned.

4. Cut into squares or triangles. Serve warm with whipped cream on the side for dipping.


Simple Yogurt Fruit Sauce

I am sorry I don't have a picture of this one. It is white with green flecks- and it tastes great. I used it on cut up cantaloupe and papaya, although I am sure you could use it on lots of different kinds of fruit.

Simple Yogurt Fruit Sauce

1/2 cup plain yogurt
zest of 1/2 of a lime
juice of 1/2 of a lime
3-4 TBS. honey
1/2 tsp. mint flakes

Mix all together in a measuring cup or a bowl. Serve over cut fruit.

March 26, 2011

Banana Chocolate Chip Muffins

Mr. D made these for us for Saturday brunch. We all had our fill, but couldn't resist nibbling them all day. We ended up eating them all before Sunday morning rolled around. They have just enough whole wheat to make you feel not (quite so) guilty about downing the whole batch in a sitting.

Banana Chocolate Chip Muffins (From King Arthur Flour Baker's Companion)

8 TBS. unsalted butter
1 cup granulated sugar
1 large egg
1/2 tsp. nutmeg
1/2 tsp. allspice
2 medium-size ripe bananas, mashed (about 3/4 cup)
1/3 cup milk
1 cup white whole wheat flour or traditional whole wheat flour
1 cup unbleached all-purpose flour
1 1/2 tsp. baking powder
1/2 tsp. baking soda
1/2 tsp. salt 
3/4 cup chocolate chips
1 cup walnuts, chopped (we left these out)


1. Preheat oven to 350 degrees F. 


2. In a medium-sized mixing bowl, cream together the butter and sugar until they are smooth. Scrape the bowl down, then beat in egg, spices, banana, and milk. In a separate bowl, whisk together the dry ingredients, then gently stir them into the butter-sugar mixture. 


3. Spoon batter into 12 lightly greased muffin cups. Bake the muffins for 20 minutes, or until a cake tester inserted in the center comes out clean. Remove from the oven, and after 10 minutes turn them out of the pan to cool. 


Yield: 12 muffins


March 25, 2011

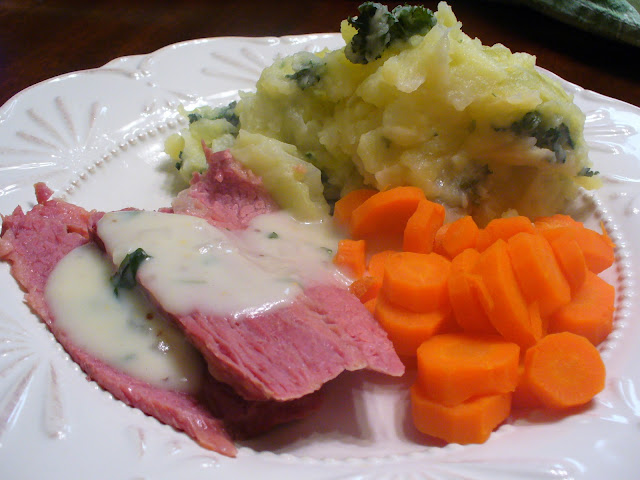
An Irish Supper


We have had a crazy few weeks, and I know I am late with this post. Regardless, this is a fantastic Irish meal.  Don't be tempted to skip the parsley sauce, it is delicious and pairs perfectly with the corned beef. I serve this meal with steamed carrots, but steamed broccoli would also be a good side and look pretty on the plate. It does take some time to make everything, so I would suggest putting the corned beef in to cook, then prepping all the rest of the ingredients. Make the colcannon through step 5. Make the parsley sauce and keep warm, then finish making the colcannon (step 6). If you are going to have carrots or broccoli, prep them along with the rest of the ingredients and steam in the microwave while you are mashing the potatoes or slicing the beef. Enjoy!


Corned Beef with Parsley Sauce and Colcannon
 For the Corned Beef:
2 lbs. corned beef (flat cut is better than point cut)
2 carrots, trimmed, peeled and chopped
1 large onion, peeled and chopped

For the Parsley Sauce: 
2 TBS. butter
2 tsp finely chopped yellow onion
2 TBS. flour
3/4 cup milk
1 tsp. chopped fresh parsley
1/2 tsp. English  mustard (I use stone ground)
Pinch nutmeg
Salt and black pepper

For the Colcannon:
4 lbs. large red potatoes (about 9) peeled and quartered
12 TBS. butter
1/2 small head cabbage, cored and thickly sliced
2 lightly packed cups chopped greens (any combination of spinach, parsley, kale, or broccoli and cauliflower leaves) 
1 1/3 cups milk
4 scallions (green onions), green part only, chopped
Salt and black pepper


1. For the corned beef: Put beef (including spice packet contents), carrots, and onions into a large pot, cover beef with water, and bring to a boil over high heat. Reduce heat to medium- low, skim foam, cover and simmer until tender, about 2 1/2 hours. Reserve 3/4 cup of the cooking liquid. 


2. For the colcannon: While the corned beef is cooking, put potatoes in a steamer basket over a large pot of simmering water. (I use my pasta pot.) Steam over medium heat until tender, about 45 minutes. (If you do not have a steam option, put potatoes in a large pot and barely cover with water. Boil gently until tender.)

3. Meanwhile, bring 1/2 cup water and 2 TBS of the butter to a boil in a small pot over medium-high heat. Add cabbage, reduce heat to medium-low, and cook until just tender, about 15 minutes. Drain well, discarding liquid, and set aside. 

4. Melt 2 TBS of the butter in a large skillet over medium-high heat. Add chopped greens and saute until just wilted, about 2 minutes. Add cabbage and cook until heated through, 1-2 minutes, then transfer to a large mixing bowl. 

5. Put milk scallions, and remaining butter into a small pot and bring to a simmer over medium heat. Simmer until scallions are softened, 1-2 minutes, then add to cabbage mixture and cover to keep warm. 

6. When potatoes are done, add to cabbage mixture and mash with a potato masher until fluffy and smooth with some chunks. Season to taste. Serve hot. 

7. For the Parsley Sauce: Melt butter in a small saucepan over medium heat. Add onions ad cook until just softened, about 1 minute. Whisk in flour until smooth, about 30 seconds. Whisk in reserved beef cooking liquid, milk, parsley, mustard, and nutmeg, and whisk until smooth. Season to taste with salt and pepper and cook, whisking, until thickened, 4-5 minutes. 

8. Drain and slice corned beef and serve with parsley sauce and colcannon.

March 10, 2011

Buffalo Chicken Nachos

The other day, I found a failure in my children's food education.  In general, I try to teach them to eat lots of different fruits and vegetables...to try new things in each season...to eat food from all over the world.  But somewhere in all of my efforts, I have neglected to expose them hot & spicy.  I guess I just have been cooling things down for them because I was afraid they wouldn't like it...but in that effort, they simply don't know what to do with spicy-hot food.

I made these Buffalo Chicken Nachos from The Girl Who Ate Everything and I thought they were delish and would be perfect for a big March-Madness party, but my kids?  Not so much.

T-Man: "Mommy!  My mouth and lips are on fire!!"
Fearless: "Mommy!  That just smells hot!"
Miss Banana: (Said nothing but after a few bites, just opened her mouth and stuck out her tongue as far as she could....then gulped down her smoothie.)

So sorry, my little loves...I have failed to teach you to appreciate spicy-hot foods.  That will have to change.  I will definately be making these again, but will use the mild Frank's Wing sauce with just a little of the hot stuff mixed in, then gradually increase the hotness until my kiddos are used to it.

Also, I found this made A LOT of nachos...next time I will probably half the recipe.


Buffalo Chicken Nachos
8 cups Ranch flavored tortilla chips (I used Cool Ranch Doritos)
4 cups cooked chicken shredded (I used a rotisserie chicken)
1 1/2 cups Frank's Buffalo Wing sauce 
water
3 cups shredded cheddar cheese
4 ounces blue cheese crumbles
1 cup chopped celery

Note: All these measurements are approximate. As with any nachos, adjust ingredients to your personal preference.

Preheat oven to 475 degrees. Spread tortilla chips on a rimmed baking sheet or in a shallow dish.

Bring wing sauce and 1/2 cup water to a simmer. Add shredded cooked chicken; heat through. Strain the chicken (reserving the sauce) and spread over ranch-flavored tortilla chips. Top with shredded cheddar.

Bake in the upper third portion of the oven until cheese is melted for about 5-7 minutes. After nachos are baked top with blue cheese, chopped celery and the reserved wing sauce.

(Adapted from Food Network Magazine)
Related Posts Plugin for WordPress, Blogger...